Saturday, March 29, 2014

Volcano Unit for Kindergartners - Part 2

Do you happen to live in a volcanic area? We unfortunately don't. I mean, Germany isn't exactly known for its volcanoes, right? Amazingly though, it does have quite a few (about a hundred) but sadly, they do not look the part anymore being that they have been extinct and worn down for millions of years. That doesn't mean my son wasn't thrilled to hear that we had one dormant volcano or that we'd climb to the top of one! Here is the latest on our volcano unit!

DSC_0652
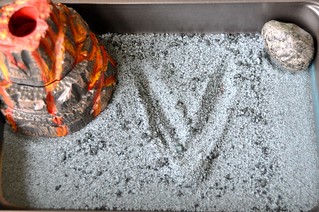
Writing in "Volcanic Sand"

We've written in sand, salt, shaving cream  and such before so this time, we wrote in "volcanic sand". I wish it were real but sadly, little me didn't think ahead and didn't bring back any black sand from the Canary Island beach we lounged on a few years back. I guess I was too busy getting my feet off of it (black sand is really hot by the way!) I made this "pretend volcanic sand" using salt and black food coloring. The plastic rock and volcano are decorations from a toy my son has. We used this tray to practice writing numbers mostly but I also saw my son borrow it to practice writing CVC words.


DSC_0050
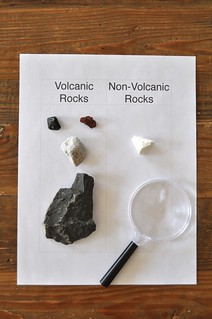
Volcanic Versus Non-Volcanic Rocks


Now these rocks are real! :) We haven't studied rocks yet so this is a new topic and it has opened a HUGE interest in rock collecting! :) With these few rocks, Adrian had to try and determine whether they were volcanic or non-volcanic rocks. Just by looking, it is not so easy. I let him sort and then I gave him a bit of information on how each rock formed to help him decide whether the rock was in the right place or not. The best part of course is simply handling the rocks...and knowing that some of these might be pulverized and laying on a black sand beach somewhere...


DSC_0653
 Plate tectonics & Volcanoes

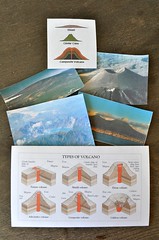
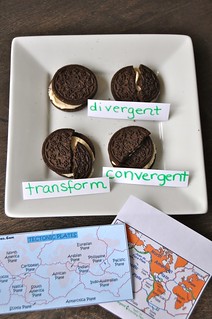
We learned a lot about volcanoes during our unit...How they grow, what comes out of them, but one question really remained: why are there so many volcanoes in some areas and none in others? It's a tricky question for the younger crowd but with the help of some creme sandwich cookies, it somehow seemed easier to explain...Thus, a big thank you to Prof. Lillie at Oregon State for providing an excerpt of his book into which he explains how plate tectonics work with the help of the delicious cookies. 
I started with a simple flat map of Earth stating that Earth's surface is like a big puzzle of 7 big pieces and several smaller ones. These pieces are called plate tectonics. These can and do move. Most of the time, we don't feel them shifting but sometimes we do; for example, there might be an earthquake! Of course, earthquakes, like volcanoes happen more in some places than others. Looking at the first plate tectonic map, I asked my son to point out our location. Ah, we were not close to any of the lines called plate tectonic boundaries. The boundaries is where most of the movement of the Earth is felt. For example, the plates sometimes grind together or pull apart. Now was the time to bring in the yumminess!
We pretended each cookie represented Earth's mantle (hard crust on top, softer mantle in the middle, lower harder mantle in touch with the liquid core of the planet at the bottom). The first cookie simply allowed me to show that a plate can slide around. They are not tight fitting. There is wiggle room. Then came a second cookie to represent a divergent plate. I broke the top, pushed it in the cream a bit and up again and left a crack. We now had a ridge. Iceland has lots of those! How many are deep enough to even let magma through? We moved on to the second plate; a transform plate. Broke the top of my cookie and made one piece grind against the other. This grinding gives us many earthquakes. A bit of the West Coast in the U.S.A. is located at the boundary of a transform plate. No wonder there are so many earthquakes in California! Finally, the last type of plate is the one that was most interesting for our study: the convergent plate, located pretty much all over the Ring of Fire... This cookie was fun. I cracked the top in two and slid one piece under the other broken piece. It did touch the bottom cookie and broke it too...allowing imaginary magma to come to the surface from the liquid core of Earth...
We now knew how plates work, where they are and why volcanoes happen more in some areas. With the plate tectonic maps, Adrian was able to locate lots of volcano sites... and assumed the volcanic islands not at boundaries were born from hot spots. Hello Hawaii and the Canary Islands!

DSC_0655
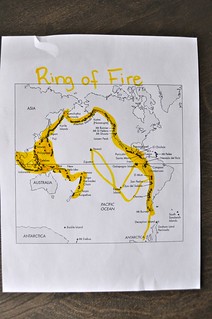
Ring of Fire Map & Highlighting

Adrian being the volcano lover that he is, he's known for a while that some areas are more prone to others to being host nations. Having explored tectonic plates, I wanted him to discover what effect these really had on the development of volcanoes so I printed a map of the famous Ring of Fire in black and white, showing where the volcanoes are (would provide link but it's already broken...). Adrian then had to "find" the Ring of Fire by highlighting the possible corridor. Of course, he didn't want to leave Hawaii and Easter Island behind so he covered those parts too but overall, he really did find the ring. Then, comparing with the plate tectonic boundary map, I asked him if these volcanoes had developed due to hot spots or due to tectonic plate movements. Without a doubt, he answered that these were located at the boundaries of various plates. These were caused by convergent plates shifting.

DSC_0663
Location & Status of the Decade Volcanoes

Sixteen volcanoes have been identified as particularly interesting by the IAVCEI. Apparently, these volcanoes should be known to the public and more closely monitored because of their location (close to populated areas) and because of their potential for destruction (they tend to be very destructive). Using a map providing the location of each of these volcanoes, Adrian and I work together to identify the current status of each as of right now. Adrian was very excited to work on this. We went through the map by continent/country and then, color-coded by status (VolcanoDiscovery is great to check out statuses and much more!). It was good geography work. Once the map was completed, we played a little game where I'd ask him to tell me how many of the decade volcanoes are erupting today or how many decade volcanoes are located in Africa, and so on.

DSC_0020
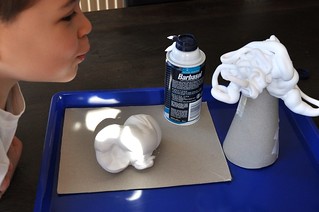
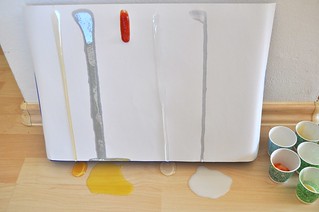
Volcano Eruption Experiment

Active volcanoes are spectacular to watch for kids. Whether it's a picture, a video or even in real life, it's simply fascinating for them. Being that we live far from most active volcanoes, I resorted to prepare our own! That is something we did last year during dinosaur week so it wasn't going to be new but it was so well received last year that surely, Adrian wouldn't mind...and he didn't. Neither did his sister. I prepared the volcano as I did last year, following Beth's instructions but going a bit heavier on the soap this time (hehehe). Adrian loved making the volcano erupt himself several times and he and his sister loved having the dinos join in the fun.

DSC_0023
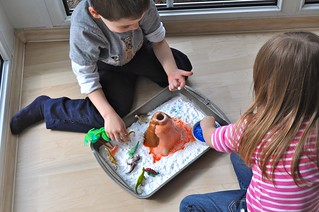
Playing with the bin

DSC_0035
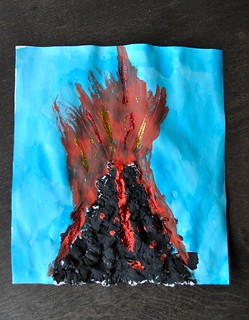
Melted Wax Crayon Volcano Craft on Canvas

Of course one piece of art for such an extensive unit was not going to cover for it so we tried this one as suggested by Ms. Lemons. I purchased a small canvas for the kids and let them paint a nice sky and ground with tempera paints and we let it dry overnight. The next day, we picked four "lava-colored" crayons and taped them to our landscape using masking tape. It was now time to make the volcano erupt. With the use of a hair dryer, we melted the crayons. It didn't take that long. It's a slow start but once it's going, it's flowing! I let my oldest try with the hair dryer but he thought it was a bit too noisy and heavy and preferred to cover his ears while I melted the crayons under his fascinated eyes. He somehow did not believe this would work! :) While the wax cooled, the kids each drew a cone shaped volcano on a small paper bag and cut it. Once the wax was completely cooled, we glued it to our crayons and landscape. This craft was, to this day, one of my son's favorites. He is asking to melt more crayons almost everyday now! :)

DSC_0642
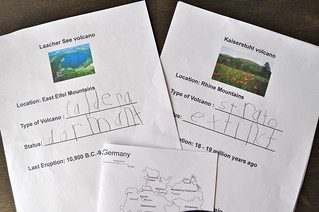
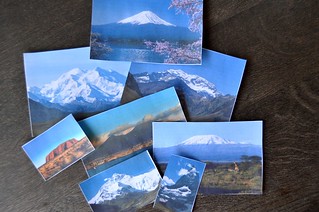
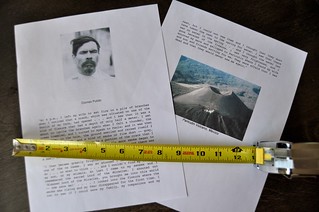
Famous German Volcanoes

Of course when studying a topic as fascinating as volcanoes, children will often wonder if there are such "mountains of fire" close to them. My son had asked and I thought I'd prepare a small booklet of Germany's Top 3 volcanoes for him. In the folder, he found a map showing where each volcano was but also where he lives as well as a file for each volcano. Together, we read a bit about each to find out their status and type.

DSC_0011
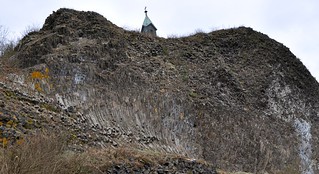
Field trip to a German Volcano!

"Visiting" a volcano will of course not be possible for everyone but if it is, it makes for a wonderful field trip. My son was oh-so-happy to hike to the top of this very extinct volcano and see all these basalt rocks. Even better, he got to bring one back and the one he picked clearly shows the path the lava went 24 millions years ago! 

DSC_0006
Adrian in front of a basalt column
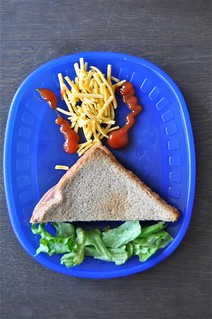
DSC_0637
A volcanic lunch

To complete your unit, what's better than an "eruptive" luncheon? Sandwiches are rarely served here because leftovers are usually what's for lunch but when nothing's left, soups and sandwiches are usually the fillers. During our volcano unit, the sandwich was not just any sandwich: it was a volcano; an active one with a ketchup and cheddar cheese lava on a bed of fresh lettuce. Needless to say, the sandwiches had never been so appealing! :)


* * *


Enjoying What You're Reading?
Follow Sorting Sprinkles on Facebook or Sign Up to be Notified When New Posts Are Out!


* * *

This week, I'm happily linking up to


Tuesday, March 25, 2014

Volcano Unit for Kindergartners - Part 1

Shortly after my boy fell in love with dinosaurs, he started associating them with volcanoes. It really seemed like every book he looked at combined them both when trying to illustrate one. Now last year, his focus was really onto the Stegosaurus and Triceratops but this year, it started shifting a bit. Curiosity had grown and he just had to know a little bit more about these mountains of fire standing in Argentinosaurus's background. Of course this unit was entirely unplanned but these can also turn out to be the most fun as we all know. Even younger sister Zahavah, a mere toddler, squealed at the many demonstrations she saw and demanded to take part into most crafts. Here I share with you all today, some of "stuff and fluff" we went through during our study of volcanoes. Enjoy!

DSC_0555
Volcano or Mountain?

What is a Volcano? After gathering some thoughts, my son's final answer was that volcanoes were mountains shaped like a cone spitting out lava. From then on, we discussed whether some volcanoes sometimes stopped spewing lava and simply looked like mountains. To this he agreed. But were all mountains volcanoes then?  My son was pretty sure they weren't. With a set of pictures printed from the Internet, he went on to sort volcanoes from mountains. Mount Kilimanjaro was the only one mistaken for a mountain (who can blame him?). Once this work was finished, I explained that a volcano really is only a crack into the Earth's surface; a crack that allows magma to come through.

DSC_0557
Paricutin is Born - A Read & Measure Story

But just how do volcanoes grow? They are born from an opening into the Earth's crust but how fast do they grow and how do they build up from a simple fissure? For this, we read an eyewitness's account of a volcano birth. My son was impressed to hear that someone had seen with their eyes a volcano start from a crack and then went on to grow right then and there. He loved hearing about the smells and noises that came with the birth of Paricutin. Once we finished reading Dioniso Pulido's story, we used a measuring tape to see how much the volcano had grown in front of that man and then, well, the tape wasn't long enough to cover for even the next 24 hours! :) 

DSC_0608
Birth &  Growth of a Volcano

Now that we knew how Paricutin had grown from a crack to a big cinder cone volcano, it was time to learn more as to what exactly made it grow... Per an idea seen on I.Science Mate, I used a cereal cardboard box to pre-make two volcanoes: a well-known stratovolcano and a simple fissure (poked a hole in the cardboard) aka a volcano being born. With some shaving cream, I demonstrated how the magma came to the surface of the Earth through the crack (hole poked, pushing cream through from underneath). As the cream accumulated, our newly born volcano started to grow and to build up. The "lava" was piling up. We did not really enter the details but I did mention the occurrence of lava bombs, ash, tephra and such coming out as well. As for the stratovolcano, well, I chose to demonstrate with that one as well to show that even big volcanoes will keep building up and will only get bigger as they erupt time after time. I also explained the role gas played into the expelling of the magma. After all, volcanoes do stop erupting at some point (well, most of them do at least...)

DSC_0611

DSC_0615
Types of Volcanoes and Playdough Volcanoes

Having looked at different pictures of volcanoes, my son was well aware that not all volcanoes looked alike. It was time to talk about the three main types of volcanoes. We knew how they were born, we knew what made them  grow but we did not know why they grew differently. Did it have anything to do with their eruption style? Gas levels? Magma viscosity? Yes indeed! With some logic, we were able to determine that shield volcanoes were gentle "erupters" since they did not have the "traditional cone shape" and that their lava must have been very runny to spread so far and create such long and large volcanoes. On the opposite spectrum, a stratovolcano had to be explosive and shoot up in the air to produce such a cone. The magma also had to be thick and sticky to stay up on the "cone mountain". But what about a cinder cone? An "in betweener"? Sort of. A bit explosive...Actually kind of runny lava. Main difference? Gas levels! Once we sorted it all, the major hands-on fun began: making all three types of volcanoes using play dough and if desired...pipe cleaners for eruptions! Learn more about the three types of volcanoes here and here.

DSC_0629
Lava Viscosity Demonstration

Is mama making a mess? Oh did the kids love this one! All this food making a mess on the floor! It certainly triggered a lot of laughing...and it was all in the name of science. Earlier in the week we had talked about magma being of different thickness and lava traveling at different speeds, thus participating in the creation of various shapes of volcanoes.  For this demonstration, I gathered, 5 liquids (all representing lava), a thick sheet of paper (usually for fingerpainting) and a huge plastic tray (usually for fingerpainting as well but I turned it around and taped the sheet to it) which I inclined and put  a taped mark on the floor in case it shifted during the demo. One after the other, the substances were poured from the same spot on top of the sheet at about the same speed. Which was the fastest "lava"? Which was the slowest? Was it the one you thought prior to the experiment? Some actual lava is sticky and runny like honey apparently. Wouldn't want to be around that volcano when it erupts but I'd run faster if it were a "milky" eruption!  

Substances used (all in the same quantity!):
Honey
Olive Oil
Ketchup
Corn Syrup
Milk

Once more looking at the shapes of our volcanoes, it seemed like shield volcanoes could very well fit the "milk" kind of lava...Spreading kind, the kind that creates islands! :)

DSC_0645
3D Volcano Craft

Although it will take you several hours/days to complete this volcano craft (depending on your drying time), it is, as you can see, well worth it. The process is very hands on and enjoyable for children and the product is just as great. Start with a thick sheet of paper or even a cardboard. Have your child draw a basic cone shape volcano or any other volcano shape he/she'd like for that matter. Once that is done, time to cut in 4 pieces several sheets of toilet paper. These will then be scrunched into little balls and dipped into slightly watered-down liquid glue to finally be pressed into the drawn volcano shape. When everything is dry, more of that glue should be painted over the volcano so that later on, the paint can be spread easily. When everything is dry, the sky can be painted (we used watercolors) and finally, the volcano itself (we used dark grey tempera). When all is dry, "lava" can be added using Q-tips and red-orange tempera paint. Let dry again and apply (for fun and extra effect) some red and gold glitter glue. The craft seen above was entirely made by my 5.5 year old. My 3 year old made hers as well and hers was just as nice. She didn't paint the sky entirely (got tired) but thoroughly loved every minute of the volcano craft creation. Original idea: Our Worldwide Classroom.

DSC_0664
Are Volcano Eruptions a Good Thing or Not?

Needless to say to a child who loves volcanoes, volcanoes are spectacular! Of course, Adrian being 5, he also knows that volcanoes come with their share of problems. The goal of this activity was for Adrian to sort through 8 effects of volcanoes and decide whether it was a positive or negative effect. Not problems with the sorting whatsoever, even if some were more obvious than others.


DSC_0656
Parts of a Volcano - 3 part cards

Haven't done 3 part cards in a while it seems. Couldn't resist this freebie from The Helpful Garden though. It helped reinforced the concept of volcano vent, crater, magma chamber and other terms we used during the unit so I was happy when I found them! :) 

Looking for more volcano activities? Of course you are! Part 2 of this volcano unit should be published soon! :)


* * *


Enjoying What You're Reading?
Follow Sorting Sprinkles on Facebook or Sign Up to be Notified When New Posts Are Out!


* * *

This week, I'm happily linking up to

Thursday, March 13, 2014

South America Unit for Kindergartners

We have yet to visit South America for real but in the meantime, we paid it a visit through our little continent unit. We enjoyed making some crafts reminiscent of the place, learned about some of its animals, looked at the map and the country flags and even bought ourselves a succulent Brazilian watermelon! :) Oh...did I forget to mention that we thoroughly enjoyed the music? What's South America without an Argentinian Tango, a Brazilian Bossa Nova or an Ecuadorian Pasillo?

DSC_0553
Homemade Chilean Rainstick
I've been on the hunt for a real, authentic rainstick from Chile for a while now but until I find the perfect one (or rather...until I buy one myself in Chile probably), I had the kids make their own. We first watched a short video to see what a rainstick really is, how it sounds, how it's made and finally made our own using what we had on hand (no...no dry cactus here I'm afraid). I had planned on Adrian doing this by himself but little Z was around and craft time is always something she "must" do. We used an empty wrapping paper roll as a base, finishing nails were hammered in (the more, the slower your filler will go down) and then one end was shut with wax paper and tape. Various beans and peas were used to fill the tube before having the other end shut tight. Finally, it was decoration time. I provided felt scraps (mostly jaguar print) and vividly colored feathers reminiscent of a macaw or toucan. To help the drying process of felt over cardboard, elastic bands were wrapped around the sticks and then...the party began! :) 

DSC_0552
Materials used to make the rainsticks

DSC_0549
Layers of the rainforest cut & paste
Ecosystems are a very advanced concept and since Adrian never showed much interest in rainforests, I decided to only offer a quick overview of the Amazon rainforest. We explored the basic layers and finished with a collage of the fauna living in these different layers. Down on the floor, we had an antearter, a jaguar and a piranha. In the understorey, a boa constrictor and a leaf-cutter ant. In the canopy, a sloth, a toucan and a howler monkey. Finally, in the emergent layer was a harpy eagle, a macaw and a blue morpho butterfly. Of course, we discussed how some butterflies go through all the layers and how some animals, like the sloth, can spend most of their life in the very same tree. :)

DSC_0483
Flags of South America, Syllables and Chocolate Chips
Renae, at Every Star is Different, had a South America week this year as well and made these beautiful syllable cards for her family. Adrian knows how to count syllables in words but in country names, it can be more tricky so I thought we'd try this. Our markers were chocolate chips...because chocolate is pretty much a South American treat! :)

DSC_0470
Pin Flags & South American Map

As usual, a "giant" continent map and pin flags. This time, for a change, the flags were stuck in play dough which had to be transported onto the map. No poking into a board.

DSC_0487
Origami jumping Poison Dart Frog
Colorful froggies are all over the Amazon and it made me nostalgic of those jumping frogs we used to make as kids. Surely, it wasn't too hard to make that kind of origami! Turns out, it's not too hard but it's not completely hands-off. My son needed a bit of guidance to complete his frog but loved his final result and made it do back flips quite a bit. In fact, he still is.

DSC_0463
Color by Country - South America
Who doesn't like coloring? Here, a color-by-country map of South America. To control errors, I had a "master" copy already colored but Adrian was allowed used of his atlas and globe too. He did well, remembering where each country was.

DSC_0484
Fill in the Missing Letters

Fine motors have long been a struggle here, in particular the pencil grip. In the winter, I finally "broke down" and ordered a "handwriting program" to teach Adrian proper handwriting and it has been very helpful for him. We have gone through all the capitals and numbers and are now going through the lowercase letters but for this activity, only capital letters were necessary. He loved being able to practice his "big" letters. Each South America country was listed so in the end, I think 5 letters had not gotten a chance to be on paper and he had to find out which ones they were and write them down. It added to the excitement...and added to the practice of handwriting! :)

DSC_0626
Llama craft - wrapping with thread/yarn

The llama being such a representative animal of South America, I thought it deserved its own craft. This one (found it by "googling" llama craft) with popsicle sticks and yarn/thread is sure to get those fine motor skills going too. First, the sticks have to be glued together and allowed to dry (we used liquid glue) and the next day, the "wrapping" can begin. For the head, a simple oval can be cut and a small goggly eye added. I wish we had small oval woodsies for the head! :(

* * *


Enjoying What You're Reading?
Follow Sorting Sprinkles on Facebook or Sign Up to be Notified When New Posts Are Out!


* * *

This week, I'm happily linking up to

Friday, March 7, 2014

Princess Unit for Toddlers

Whoever said the princess theme can't be brought into a toddler's Montessori "classroom"? Children love princesses and I knew my daughter would be delighted to see royal trays for a week. My aim was to keep it grounded in reality...because royalty really does exist! :)

DSC_0474
Coloring a real palace with gem crayons

Funnily enough, although our family has traveled a lot, we have yet to visit London (mind you, we've been to the U.K., but not England per se). Still, I thought it would be nice for Z, who love coloring, to color a real "Castle". To do so, she used my homemade royal gem crayons

DSC_0543
Pouring gems into a chest

Pretty gems! These were quite popular! Big gems found in our local euro shop, chest from Michael's a few years ago and little pitcher from Montessori Services. The activity was simple but well loved: pouring the gems from the pitcher to the chest. 

DSC_0546
Polishing a princess's mirror

I actually thought this would not come off the shelf but Zahavah liked polishing the mirror. Once. After it was clean, she made sure to keep it clean so she could hold the mirror and admire herself! :)

DSC_0469
Matching fantasy princess cards...no time to make a real set :(

Originally intended on making a matching set using pictures of real princes and princesses but I ran out of time. Instead, (and to her great delight might I add!), I substituted with Disney's Princesses from Wonder Forge's Matching Game! 

tiarabeadspipecleaner
Making a tiara with beads

Making a pipe cleaner tiara is definitely nothing new...but for Zahavah, it was. I chose metallic grey ones and metallic grey pony beads too. I shaped the tiara beforehand and then, Z only had to add beads where she wanted and as many as she wanted. 
DSC_0466
Trying it on! :)

DSC_0477
Paper punching a princess's letterhead stationary paper

Paper punching is an excellent activity for muscle strengthening so I took out some of my old corner paper punches I used for scrapbooking. I prepared stationary with letterhead for my little princess and she had lots of fun punching the corners of these papers to embellish them. Later she also drew on  them and well, I'm sure we'll be sending these out as official invitations for something very important! :)

DSC_0482
Stamping a princess's ballroom scene
Princess-themed stamps will always be greatly appreciated, no matter what, but with a special scene to stamp them in, it makes it even more fun sometimes. Mackenzie Ferry uploaded her drawing of a ballroom scene so I printed it as a backdrop for the stamping activity. Zahavah loved to positioned her princesses, crowns and horses in the stairs and all. Stamps: Melissa & Doug Wooden Princess Set.

DSC_0531
Making a tiara with gems and glitter glue
A paper tiara to decorate! Who doesn't like gluing gems and using glitter glue? I purposely chose small gems for fine motor reasons by the way. Same with the glitter glue. I chose small squeeze tubes instead of sprinkling action so my daughter could learn to control her muscles throughout this fun activity. 

DSC_0545
Royal Stables: Parts of a Horse Booklet

Parts of a horse. Quite self-explanatory I guess. This is our first "parts of a..." booklet. Zahavah loves horses and for a first book, I thought it would be appropriate. At a toddler's level, horses don't have too many "hard" words to juggle with and she already knew a few of course. To make it more concrete, I used one of my daughter's horse  to demonstrate the parts and then, one part per page would be colored in the booklet corresponding to that part.


* * *


Enjoying What You're Reading?
Follow Sorting Sprinkles on Facebook or Sign Up to be Notified When New Posts Are Out!


* * *

This week, I'm happily linking up to